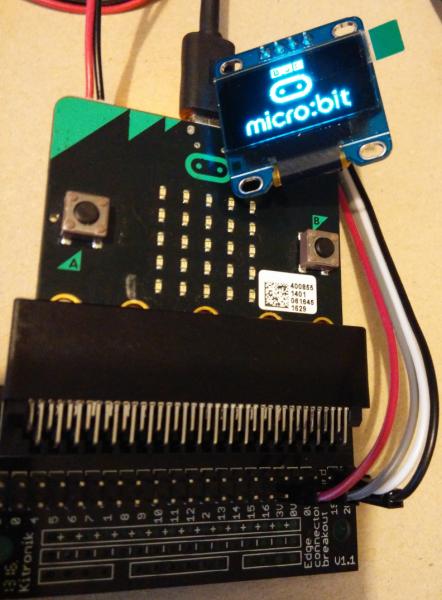
This library allows the micro:bit to control the typical low cost 0,96" OLED display sold in Amazon and eBay connected to the default I2C pins of the micro:bit. Some sort of breakout is required. Note that the Kitronik breakout does not have pre-soldered the I2C pins and you will need to attach some headers to access the I2C pins.
You should connect the device’s SCL pin to micro:bit pin 19, and the device’s SDA pin to micro:bit pin 20. You also must connect the device’s ground to the micro:bit ground (pin GND).
Due to the low memory of the micro:bit, all functions except for show_bitmap, work in zoom mode, so the effective screen resolution is 64x32 dots of 4x4 pixels of size.
Text is rendered using the internal microbit fonts.
The library is distributed in different files to allow importing only the required functions in order to reduce memory consumption.
- Load a 128x64 bitmap file
- Set and get pixel value
- Render of text using the internal micro:bit font
- Support of micro:bit Image object by transforming it into a stamp that can be displayed
- Sample programs demonstrating the different functions
Create a bitmap with an image editor with only 2 bits per pixel (black and white)
Use the LCDAssistant (http://en.radzio.dxp.pl/bitmap_converter/) to generate the hex data.
Copy the hex data into the bitmap_converter.py file in the sample_images folder and run it on a computer with Python.
Flash a completely empty file from mu.
Copy the generated file to the micro:bit using the file transfer function in mu
Create a main.py file, import sdd1306_bitmap and use the function show_bitmap to display the file
Move the files main.py, sdd1306.py and sdd1306_bitmap.py to the micro:bit with the file transfer function in mu
Reset the micro:bit or press CTRL+D in the Repl.
You have to use this instruction before using the display. This puts the display in its reset status.
You will typically use this function after initialize(), in order to make sure that the display is blank at the beginning.
Displays on the OLED screen the image stored in the file filename. The image has to be encode as described in the previous section.
from ssd1306 import initialize, clear_oled
from ssd1306_bitmap import show_bitmap

initialize()
clear_oled()
show_bitmap("microbit_logo")Paints the pixel at position x, y (of a 64x32 coordinate system) with the corresponding color (0 dark or 1 lighted). If the optional parameter draw is set to 0 the screen will not be refreshed and draw_screen() needs to be called at a later stage, since multiple screen refreshes can be time consuming. This allows setting different pixels in the buffer without refreshing the screen, and finally refresh the display with the content of the buffer.
from ssd1306_px import set_px
from ssd1306 import draw_screen, initialize, clear_oled

initialize()
clear_oled()
set_px(10,10,1)
set_px(20,20,0,0)
draw_screen()Returns the color of the given pixel (0 dark 1 lighted)
from ssd1306 import initialize, clear_oled
from ssd1306_px import get_px

initialize()
clear_oled()
color=get_px(10,10)Prints the text given by text at the row x and column y. The screen is divided into 12 columns and 5 rows. If the optional parameter draw is set to 0 the screen will not be refreshed and draw_screen() needs to be called at a later stage, since multiple screen refreshes can be time consuming. This allows writing different rows in the buffer without refreshing the screen, and finally refresh the display with the content of the buffer.
from ssd1306 import initialize, clear_oled
from ssd1306_text import add_text

initialize()
clear_oled()
add_text(0, 2, "Hello, world")Creates a stamp from an Image object. A stamp is just a set of bytes that will be used to print the image on the OLED display. The function transforms any led value different than 0 to 1. A stamp is defined with 5 columns of 8 pixels each, so a stamp occupies 5 bytes of memory and can also be defined as a bytearray of 5 bytes. If the stamp has been created from an Image, the stamp will be created centering the image. This command is used in combination of draw_stamp
Draws the stamp on the screen at the pixel position x, y. The stamp will be printed using OR if color is 1 and AND NOT if color is 0, effectively removing the stamp when color=0.
from ssd1306 import initialize, clear_oled
from ssd1306_stamp import draw_stamp
from ssd1306_img import create_stamp
from microbit import Image

initialize()
clear_oled()
stamp = create_stamp(Image.HEART)
draw_stamp(10, 10, stamp, 1)
When drawing a stamp, the contents of the screen just before the first column of the stamp and the content of the screen just after the last column of the stamp is also redrawn. This is done to allow using a function like this to perform a simple movement of a stamp:
def move_stamp(x1, y1, x2, y2, stmp):
  draw_stamp(x1, y1, stmp, 0, 0)
  draw_stamp(x2, y2, stmp, 1, 1)
The previous function removes a stamp at position x1,y1 and redraws it at position x2, y2. Note that the first draw_stamp() does not refresh the screen. The screen is only refreshed once, with the second draw_stamp(). If the stamp is 5x5 and it is centered within the 8x7 area, the stamp will be properly updated if the distance between the two coordinates is maximum one pixel.
Modifies the contrast of the screen progressively to create pulse effect. Thanks to Steve Stagg for his suggestion.
from ssd1306 import initialize, clear_oled
from ssd1306_bitmap import show_bitmap
from ssd1306_effects import pulse

initialize()
clear_oled()
show_bitmap("microbit_logo")
pulse()Makes the screen blink by switching it off and on.
from ssd1306 import initialize, clear_oled
from ssd1306_bitmap import show_bitmap
from ssd1306_effects import blink

initialize()
clear_oled()
show_bitmap("microbit_logo")
blink()