Welcome to the Military history of Australia portal!
The RAN Ensign
The flag of Australia
The RAAF Ensign
The military history of Australia spans the nation's 230-year modern history, from the early Australian frontier wars between Aboriginal people and Europeans to the ongoing conflicts in Iraq and Afghanistan in the early 21st century. Although this history is short when compared to that of many other nations, Australia has been involved in numerous conflicts and wars, and war and military service have been significant influences on Australian society and national identity, including the Anzac spirit. The relationship between war and Australian society has also been shaped by the enduring themes of Australian strategic culture and the unique security challenges it faces.
The six British colonies in Australia participated in some of Britain's wars of the 19th century. In the early 20th century, as a federated dominion and later as an independent nation, Australia fought in the First World War and Second World War, as well as in the wars in Korea, Malaya, Borneo and Vietnam during the Cold War. In the Post-Vietnam era Australian forces have been involved in numerous international peacekeeping missions, through the United Nations and other agencies, including in the Sinai, Persian Gulf, Rwanda, Somalia, East Timor and the Solomon Islands, as well as many overseas humanitarian relief operations, while more recently they have also fought as part of multi-lateral forces in Iraq and Afghanistan. In total, nearly 103,000 Australians died during these conflicts. (Full article...)
Featured articles are displayed here, which represent some of the best content on English Wikipedia.
Image 1
United States Marines rest in the field during the Guadalcanal campaign.
The Guadalcanal campaign, also known as the Battle of Guadalcanal and codenamed Operation Watchtower by American forces, was a military campaign fought between 7 August 1942 and 9 February 1943 on and around the island of Guadalcanal in the Pacific theater of World War II. It was the first major land offensive by Allied forces against the Empire of Japan.
On 7 August 1942, Allied forces, predominantly United States Marines, landed on Guadalcanal, Tulagi, and Florida Island in the southern Solomon Islands, with the objective of using Guadalcanal and Tulagi as bases in supporting a campaign to eventually capture or neutralize the major Japanese base at Rabaul on New Britain. The Japanese defenders, who had occupied those islands since May 1942, were outnumbered and overwhelmed by the Allies, who captured Tulagi and Florida, as well as the airfield—later named Henderson Field—that was under construction on Guadalcanal. (Full article...)
Image 2
Clare Grant Stevenson, AM, MBE (18 July 1903 – 22 October 1988) was the inaugural Director of the Women's Auxiliary Australian Air Force (WAAAF), from May 1941 to March 1946. As such, she was described in 2001 as "the most significant woman in the history of the Air Force". Formed as a branch of the Royal Australian Air Force (RAAF) in March 1941, the WAAAF was the first and largest uniformed women's service in Australia during World War II, numbering more than 18,000 members by late 1944 and making up over thirty per cent of RAAF ground staff.
Born and educated in Victoria, Stevenson was an executive with the Berlei company when she was appointed Director WAAAF. Initially ranked squadron officer, she rose to become group officer by April 1942. Stevenson resumed her civilian career following her discharge from the Air Force in 1946. Long active in adult education and social welfare, she helped form aid organisations including the Carers Association of New South Wales (now Carers NSW) after retiring from Berlei in 1960. Stevenson was appointed a Member of the Order of the British Empire and a Member of the Order of Australia for her services to the community and to female veterans. (Full article...)
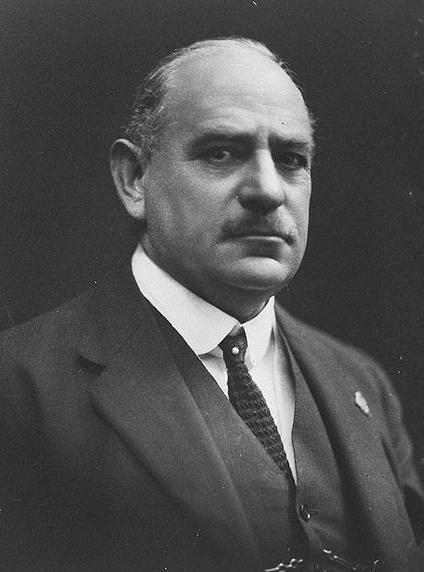
Garnet Francis Malley, MC,AFC (2 November 1892 – 20 May 1961) was an Australian fighter ace of World War I, credited with six aerial victories. He was an aviation adviser to Chiang Kai-shek's government in China during the 1930s, and an intelligence officer in World War II.
RAAF Hornets were first sent on a combat deployment as part of the Australian contribution to the 2003 invasion of Iraq. During the invasion, 14 Hornets flew patrols over Iraq, as well as close air supportsorties to assist coalition ground forces. RAAF F/A-18s also provided security for the American air base at Diego Garcia between late 2001 and early 2002, and have protected a number of high-profile events in Australia. Between 2015 and 2017 a detachment of Hornets was deployed to the Middle East and struck ISIL targets as part of Operation Okra. (Full article...)
Image 6
RAAF area commands, November 1942. Eastern Area's boundaries remained in place until it re-formed as Home Command in October 1953, beginning the supersession of the area command system.
The area command continued to function after the war, its headquarters transferring from Sydney to Glenbrook, in the Blue Mountains, in 1949. By this time, most of the RAAF's operational units—including fighter, bomber, and transport wings—were based within Eastern Area's boundaries, and the officer in command was responsible for air defence across all of Australia. In October 1953, the RAAF began reorganising its command-and-control system from one based on geography to one based on function; Eastern Area was re-formed as Home Command, which was renamed Operational Command in 1959, and Air Command in 1987. (Full article...)
Image 7
Bobby Gibbes, North Africa, c. January 1942
Robert Henry Maxwell Gibbes, DSO,DFC & Bar,OAM (6 May 1916 – 11 April 2007) was an Australian fighter ace of World War II, and the longest-serving wartime commanding officer of No. 3 Squadron RAAF. He was officially credited with 10¼ aerial victories, although his score is often reported as 12, including two shared; Gibbes was also credited with five aircraft probably destroyed, and a further 16 damaged. He commanded No. 3 Squadron in North Africa from February 1942 to April 1943, apart from a brief period when he was wounded.
Hely spent the immediate post-war period on the staff of RAAF Headquarters, Melbourne. From 1951 to 1953 he served as Air Officer Commanding (AOC) Western Area Command in Perth, after which he was appointed a Commander of the Order of the British Empire. He was Deputy Chief of the Air Staff from 1953 to 1956, AOC Training Command from 1956 to 1957, and Head of the Australian Joint Services Staff in Washington, D.C. from 1957 to 1960. He then served as Air Member for Personnel (AMP) for six years, his tenure coinciding with a significant increase in manpower to meet commitments in South East Asia and the demands of a major re-equipment program. Having been promoted acting air vice marshal in 1953 (substantive in 1956), he was appointed a Companion of the Order of the Bath in 1964 for his service as AMP. He retired from the Air Force in 1966 and made his home in Canberra, where he died in 1970 at the age of sixty. (Full article...)
The above map shows how the network of fortresses defended the approaches to Hobart. The shaded white areas show the effective range of the fort's gun positions.
The Hobart coastal defences are a network of now defunct coastal batteries, some of which are inter-linked with tunnels, that were designed and built by British colonial authorities in the nineteenth century to protect the city of Hobart, Tasmania, from attack by enemy warships. During the nineteenth century, the port of Hobart Town was a vital re-supply stop for international shipping and trade, and therefore a major freight hub for the British Empire. As such, it was considered vital that the colony be protected. In all, between 1804 and 1942 there were 12 permanent defensive positions constructed in the Hobart region.
Prior to Australian Federation, the island of Tasmania was a colony of the British Empire, and as such was often at war with Britain's enemies and European rivals, such as France and later Russia. The British had already established the colony of Sydney at Port Jackson in New South Wales in 1788, but soon began to consider the island of Tasmania as the potential site of a useful second colony. It was an island, cut off from the mainland of Australia and isolated geographically, making it ideal for a penal colony, and was rich in timber, a resource useful to the Royal Navy. In 1803, the British authorities decided to colonise Tasmania, and to establish a permanent settlement on the island that was at the time known as Van Diemen's Land, primarily to prevent the French from doing so. During this period tensions between Great Britain and France remained high. The two nations had been fighting the French Revolutionary Wars with each other through much of the 1790s, and would soon be engaging each other again in the Napoleonic Wars. (Full article...)
Image 2
The JORN area of operation. The Jindalee Operational Radar Network (JORN) is an over-the-horizon radar (OHR) network operated by the Royal Australian Air Force (RAAF) that can monitor air and sea movements across 37,000 square kilometres (14,000 sq mi). It has a normal operating range of 1,000–3,000 kilometres (620–1,860 mi). The network is used in the defence of Australia, and can also monitor maritime operations, wave heights and wind directions.
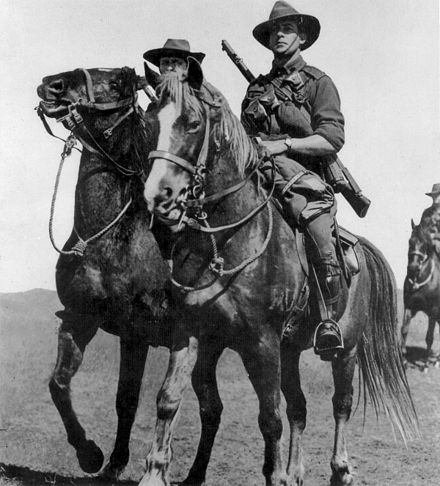
Australian light horsemen on Walers in 1914, prior to their departure from Australia to serve in World War I Australian Light Horse were mounted troops with characteristics of both cavalry and mounted infantry, who served in the Second Boer War and World War I. During the inter-war years, a number of regiments were raised as part of Australia's part-time military force. These units were gradually mechanised either before or during World War II, although only a small number undertook operational service during the war. A number of Australian light horse units are still in existence today. (Full article...)
Different variants of the Boomerang were manufactured under a series of corresponding production contract numbers CA-12, CA-13, CA-14 and CA-19, the aircraft supplied under each subsequent contract would incorporate various modifications, typically aimed at improving the aircraft's performance. The Boomerang was handicapped by the available engine variant, which gave low power at altitude and resulted in the aircraft proving to be slower than contemporary fighter aircraft. The Boomerang rarely engaged in aerial combat. During early wartime operations, the Boomerang was mainly dispatched to equip home-based squadrons, freeing up other fighters for use overseas. In later service, the Boomerang would commonly be used for ground support duties, cooperating with Allied army units, in addition to secondary roles such as aerial reconnaissance and air sea rescue. (Full article...)
Image 5
A company of the Victorian Mounted Rifles on manoeuvres in Victoria in 1889. Until Australia became a Federation in 1901, each of the six colonies was responsible for its own defence. From 1788 until 1870 this was done with British regular forces. In all, 24 British infantry regiments served in the Australian colonies. Each of the Australian colonies gained responsible government between 1855 and 1890, and while the Colonial Office in London retained control of some affairs, and the colonies were still firmly within the British Empire, the Governors of the Australian colonies were required to raise their own colonial militias. To do this, the colonial Governors had the authority from the British crown to raise military and naval forces. Initially these were militias in support of British regulars, but British military support for the colonies ended in 1870, and the colonies assumed their own defence. The separate colonies maintained control over their respective militia forces and navies until 1 March 1901, when the colonial forces were all amalgamated into the Commonwealth Forces following the creation of the Commonwealth of Australia. Colonial forces, including home raised units, saw action in many of the conflicts of the British Empire during the 19th century. Members from British regiments stationed in Australia saw action in India, Afghanistan, the New Zealand Wars, the Sudan conflict, and the Boer War in South Africa.
Despite an undeserved reputation of colonial inferiority, many of the locally raised units were highly organised, disciplined, professional, and well trained. For most of the time from settlement until Federation, military defences in Australia revolved around static defence by combined infantry and artillery, based on garrisoned coastal forts; however, in the 1890s improved railway communications between all of the eastern mainland colonies (Queensland, New South Wales, Victoria, and South Australia), led Major General Bevan Edwards, who had recently completed a survey of colonial military forces, to state his belief that the colonies could be defended by the rapid mobilisation of standard brigades. He called for a restructure of colonial defences, and defensive agreements to be made between the colonies. He also called for professional units to replace all of the volunteer forces. (Full article...)
Image 6
HMAS Kanimbla entering Pearl Harbor during RIMPAC 2010
The Kanimbla class was a class of amphibious transport ships (designated Landing Platform Amphibious) operated by the Royal Australian Navy (RAN). Two ships (originally built as Newport-class tank landing ships for the United States Navy) were purchased by Australia in 1994 and modified. Problems during the handover process and the need to repair previously unidentified defects meant the ships did not enter operational service until the end of the decade.
HMAS Rankin, sixth submarine of the Collins class, underway in 2006
The Collins-class submarines are Australian-built diesel-electricsubmarines operated by the Royal Australian Navy (RAN). The Collins class takes its name from Australian Vice Admiral John Augustine Collins; each of the six submarines is named after significant RAN personnel who distinguished themselves in action during World War II. The six vessels were the first submarines built in Australia, prompting widespread improvements in Australian industry and delivering a sovereign (Australian controlled) sustainment/maintenance capability.
Planning for a new design to replace the RAN's Oberon-class submarines began in the late 1970s and early 1980s. Proposals were received from seven companies; two were selected for a funded study to determine the winning design, which was announced in mid-1987. The submarines, enlarged versions of Swedish shipbuilder Kockums' Västergötland class and originally referred to as the Type 471, were constructed between 1990 and 2003 in South Australia by the Australian Submarine Corporation (ASC). (Full article...)
Japan's geography made this invasion plan obvious to the Japanese as well; they were able to accurately predict the Allied invasion plans and thus adjust their defensive plan, Operation Ketsugō (ja), accordingly. The Japanese planned an all-out defense of Kyūshū, with little left in reserve for any subsequent defense operations. Casualty predictions varied widely, but were extremely high. Depending on the degree to which Japanese civilians would have resisted the invasion, estimates ran up into the millions for casualties. (Full article...)
Image 10
[A production AC1 tank]
An AC MkI tank on trials
The AC1 Sentinel was a cruiser tank designed in Australia in World War II in response to the war in Europe, and to the threat of Japan expanding the war to the Pacific or even a feared Japanese invasion of Australia. It was the first tank to be built with a hull cast as a single piece, and the only tank to be produced in quantity in Australia. The few Sentinels that were built never saw action as Australia's armoured divisions had been equipped by that time with British and American tanks. (Full article...)
...that Major General John Paton commanded the rear party during the evacuation of Anzac Cove in World War I and was one of the last Australian soldiers to leave the beach?
...that HMAS Biloela was the first ship to be built entirely from Australian materials to an Australian design?
These are Good articles, which meet a core set of high editorial standards.
Image 1
Damaged phosphate cantilever loading equipment following the German bombardment of Nauru on 27 December 1940
Damaged phosphate cantilever loading equipment following the German bombardment of Nauru on 27 December 1940
The German attacks on Nauru refers to the two attacks on Nauru in December 1940. Nauru is an island country in Micronesia, a subregion of Oceania, in the Central Pacific. These attacks were conducted by auxiliary cruisers between 6 and 8 December and on 27 December. The raiders sank five Allied merchant ships and inflicted serious damage on Nauru's economically important phosphate-loading facilities. Despite the significance of the island to the Australian and New Zealand economies, Nauru was not defended and the German force did not suffer any losses.
The two attacks were the most effective operations conducted by German raiders in the Pacific Ocean in World War II. They disrupted supplies of phosphate to Australia, New Zealand and Japan, which reduced agricultural production in these countries. In response, Allied naval vessels were deployed to protect Nauru and nearby Ocean Island and escort shipping in the South Pacific. Small garrisons were also established to protect the two islands. (Full article...)
Image 2
Australian soldiers from 6 RAR being picked up by helicopter during Operation Bribie, 17 February 1967.
Operation Bribie (17–18 February 1967), also known as the Battle of Ap My An, was fought during the Vietnam War in Phuoc Tuy province between Australian forces from the 6th Battalion, Royal Australian Regiment (6 RAR) and two companies of Viet Cong from D445 Battalion, likely reinforced by North Vietnamese regulars. During the night of 16 February the Viet Cong attacked a South Vietnamese Regional Force compound at Lang Phuoc Hai, before withdrawing the following morning after heavy fighting with South Vietnamese forces. Two hours later, a Viet Cong company was reported to have formed a tight perimeter in the rainforest 2 kilometres (1.2 mi) north of Lang Phuoc Hai, near the abandoned hamlet of Ap My An. In response, the Australians deployed a quick reaction force. Anticipating that the Viet Cong would attempt to withdraw, as they had during previous encounters, forces from the 1st Australian Task Force (1 ATF) were inserted to block the likely withdrawal route in the hope of intercepting and destroying them.
On the afternoon of 17 February, American UH-1 Iroquois helicopters and M113 armoured personnel carriers (APCs) deployed 6 RAR into the area north-west of Hoi My. Following an airmobile assault into an unsecured landing zone at 13:45, A Company 6 RAR was surprised by a strong, well-sited and dug-in Viet Cong force – which, rather than withdrawing, had likely remained in location in an attempt to ambush any reaction force sent to the area. The Australians were soon hit by heavy small arms fire, with a third of the lead platoon falling wounded in the initial volleys. A Company subsequently broke contact and withdrew under heavy fire from what appeared to be a Viet Cong base area. Initially believing they were opposed by only a company, 6 RAR subsequently launched a quick attack by two companies. However, unknown to the Australians, the Viet Cong had been reinforced and they now faced a battalion-sized force in well prepared positions. (Full article...)
The RAAF's wartime area commands: originally to have been called Northern Area, Northern Command was formed in April 1944, re-designated Northern Area in December 1945, and disbanded in February 1947.
No. 6 Squadron is a Royal Australian Air Force (RAAF) electronic attack squadron. It was formed in 1917 as a training unit based in England during World War I. The squadron was disbanded in 1919 but re-formed at the start of 1939. It subsequently saw combat as a light bomber and maritime patrol squadron during World War II, and took part in the New Guinea Campaign and New Britain Campaign before being disbanded after the war.
The squadron was re-raised in 1948 as the RAAF's bomber operational conversion unit. It has primarily served in this capacity since that time, though it has maintained a secondary strike capability and was also tasked with reconnaissance duties between 1979 and 1993. No. 6 Squadron is based at RAAF Base Amberley, Queensland, and was equipped with Boeing F/A-18F Super Hornet aircraft from January 2011 to December 2016. The squadron converted to Boeing EA-18G Growler electronic attack aircraft in 2017. (Full article...)
On 20 October, the US 187th Airborne Regimental Combat Team (187 RCT) staged a parachute assault at Sukchon and Sunchon, about 40 kilometres (25 mi) north of Pyongyang, with the objectives of cutting off KPA forces retreating ahead of the US Eighth Army general advance from the south, capturing important North Korean government officials evacuating Pyongyang, and liberating American prisoners of war (POWs) being moved out of Pyongyang. On 21 October, two 187th Airborne Infantry Regiment (187 ABN) combat teams started southwards in a reconnaissance-in-force to clear the Sukchon–Yongyu highway and rail line and to establish contact with the 27th British Commonwealth Brigade that was leading the Eighth Army advance northwards from Pyongyang. 187 ABN came under fire from the KPA 239th Regiment in the vicinity of Yongyu. As a result of the US airborne operation, the KPA 239th Regiment found itself caught between the Eighth Army advance and the 187 ABN attack in its rear. The KPA 239th Regiment attempted a breakout to the north just after midnight on 21–22 October. Facing determined attacks, the American paratroopers at Yongyu requested armoured assistance from the 27th British Commonwealth Brigade on the Pyongyang–Sukchon road just south of Yongyu. (Full article...)
Image 7
American manned Alligators during the landing of Australian troops at Balikpapan, Borneo
American manned Alligators during the landing of Australian troops at Balikpapan, Borneo
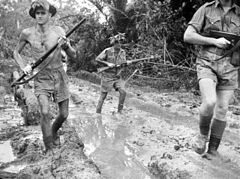
The Battle of Balikpapan was the concluding stage of Operation Oboe, the campaign to liberate Japanese-held British and Dutch Borneo. The landings took place on 1 July 1945. The Australian 7th Division, composed of the 18th, 21st and 25th Infantry Brigades, with a small number of Netherlands East Indies KNIL troops, made an amphibious landing, codenamed Operation Oboe Two, a few miles north of Balikpapan. The Allied invasion fleet consisted of around 100 ships. The landing had been preceded by heavy bombing and shelling by Australian and US air and naval forces. The Allied force totalled 33,000 personnel and was commanded by Major General Edward Milford, while the Japanese force, commanded by Rear Admiral Michiaki Kamada, numbered between 8,400 and 10,000, of which between 3,100 and 3,900 were combatants. After the initial landing, the Allies secured the town and its port, and then advanced along the coast and into the hinterland, capturing the two Japanese airfields. Major combat operations concluded around 21 July, but were followed by mopping-up operations, which lasted until the end of the war in mid-August. Australian troops remained in the area until early 1946. (Full article...)
Image 8
Flight Lieutenant Shannon shortly before taking part in the "Dambusters" raid with No. 617 Squadron RAF, May 1943
Troops from 'C' Company, 2/48th Battalion advance alongside Matilda tanks from the 2/9th Armoured Regiment during the attack on the "Sykes" feature on Tarakan in April 1945
During the campaign in New Guinea, the battalion took part in the advance on Lae during the Salamaua–Lae campaign and the fighting around Finschhafen and Sattelberg, during the Huon Peninsula campaign. Following this it was withdrawn to Australia, where it remained for over a year. In mid-1945, the 2/48th Battalion took part in the landing on Tarakan, which was its final involvement in the war. It was disbanded in October 1945 and is considered to be Australia's most highly decorated unit of the war, with four members receiving the Victoria Cross, the nation's highest decoration for gallantry, while over 90 other decorations were also made to its members. (Full article...)
Image 10
Australian soldiers defending FSB Coral, May 1968
The Battle of Coral–Balmoral (12 May – 6 June 1968) was a series of actions fought during the Vietnam War between the 1st Australian Task Force (1 ATF) and the North VietnamesePeople's Army of Vietnam (PAVN) 7th Division and Viet Cong (VC) Main Force units, 40 kilometres (25 mi) north-east of Saigon. Following the defeat of the PAVN/VC Tet offensive in January and February, in late April two Australian infantry battalions—the 1st and 3rd Battalions of the Royal Australian Regiment (RAR)—with supporting arms, were again deployed from their base at Nui Dat in Phước Tuy Province to positions astride infiltration routes leading to Saigon to interdict renewed movement against the capital. Part of the wider allied Operation Toan Thang I, it was launched in response to intelligence reports of another impending PAVN/VC offensive, yet the Australians experienced little fighting during this period. Meanwhile, the PAVN/VC successfully penetrated the capital on 5 May, plunging Saigon into chaos during the May Offensive in an attempt to influence the upcoming Paris peace talks scheduled to begin on the 13th. During three days of intense fighting the attacks were repelled by US and South Vietnamese forces, and although another attack was launched by the PAVN/VC several days later, the offensive was again defeated with significant losses on both sides, causing extensive damage to Saigon and many civilian casualties. By 12 May the fighting was over, and the PAVN/VC were forced to withdraw having suffered heavy casualties. US casualties were also heavy and it proved to be their most costly week of the war.
1 ATF was redeployed on 12 May to obstruct the withdrawal of forces from the capital, with two battalions establishing a fire support base named FSB Coral, just east of Lai Khê in Bình Dương Province, in an area of operations known as AO Surfers. However, poor reconnaissance and inadequate operational planning led to delays and confusion during the fly-in, and the Australians had only partially completed FSB Coral by the evening. The PAVN mounted a number of battalion-sized assaults on the night of 12/13 May, with a heavy bombardment from 03:30 signalling the start. Exploiting the disorganised defence to penetrate the Australian perimeter, the PAVN 141st Regiment temporarily captured a forward gun position during close-quarters fighting, before being repulsed by superior firepower that morning. Casualties were heavy on both sides, but the Australians had won a convincing victory. The following day 1 RAR was deployed to defend FSB Coral, while 3 RAR established FSB Coogee to the west to ambush staging areas and infiltration routes. Coral was again assaulted in the early hours of 16 May, coming under a heavy barrage followed by another regimental-sized attack. Again the base was penetrated, but after a six-hour battle the PAVN were forced to withdraw after suffering heavy losses. Expecting further fighting, the Australians were subsequently reinforced with Centurion tanks and additional artillery. On 22 May, FSB Coral was again attacked overnight, coming under a short but accurate mortar bombardment which was broken up by Australian artillery and mortars. (Full article...)
Image 21Women friends and family on the wharf waving farewell to the departing troop ship RMS Strathallan carrying the Advance Party of the 6th Division to service overseas. They include George Alan Vasey's wife Jessie Vasey (second from the left). The photograph is especially poignant because Vasey did not survive the war. (from Military history of Australia during World War II)
Image 52Australian sailors take possession of a midget submarine at a Japanese naval base near Tokyo in September 1945. (from History of the Royal Australian Navy)
Image 81The light cruiser HMAS Hobart showing torpedo damage inflicted by a Japanese submarine on 20 July 1943. Hobart did not return to service until December 1944. (from History of the Royal Australian Navy)
In view of the result of attained at the Washington Treaty which, my advisors believe, guarantee peace in the Pacific for some time to come, it is proposed to reduce the establishment of the navy and army, and postpone the expansion of the air force.


![[A production AC1 tank]](http://upload.wikimedia.org/wikipedia/commons/thumb/1/1f/Sentinel_%28AWM_101156%29.jpg/600px-Sentinel_%28AWM_101156%29.jpg)