Deploy Ruby on Rails App to DigitalOcean
Ruby on Rails is an amazingly popular framework for developing web applications. In fact, a large portion of DeployBot itself is a Rails app. Rails removes a lot of the pain of modern web development, making it a great choice for delivering value to your customers and users fast and efficiently.
However, the question of how to deploy a Rails app is something you have to answer on your own since Rails doesn’t provide a built-in solution for this. In this guide, I’ll explain how to use DeployBot for automating Ruby on Rails deployment, making it reproducible, consistent and transparent for you and your teammates.
We’ll set up an automated deployment process using a brand new DigitalOcean Ruby on Rails droplet. If you’re deploying to your own servers, you can skip the DigitalOcean steps and use your own connection details.
Preparation
To use our Rails deployment tools, you'll need a DeployBot account. (Don't have one yet? Create your DeployBot account here.)
If you don’t already have a server to deploy to, I suggest you use a DigitalOcean Ruby on Rails droplet. You can create it using their very detailed guide for setting up a Rails app on DigitalOcean.
Set up your deployment environment
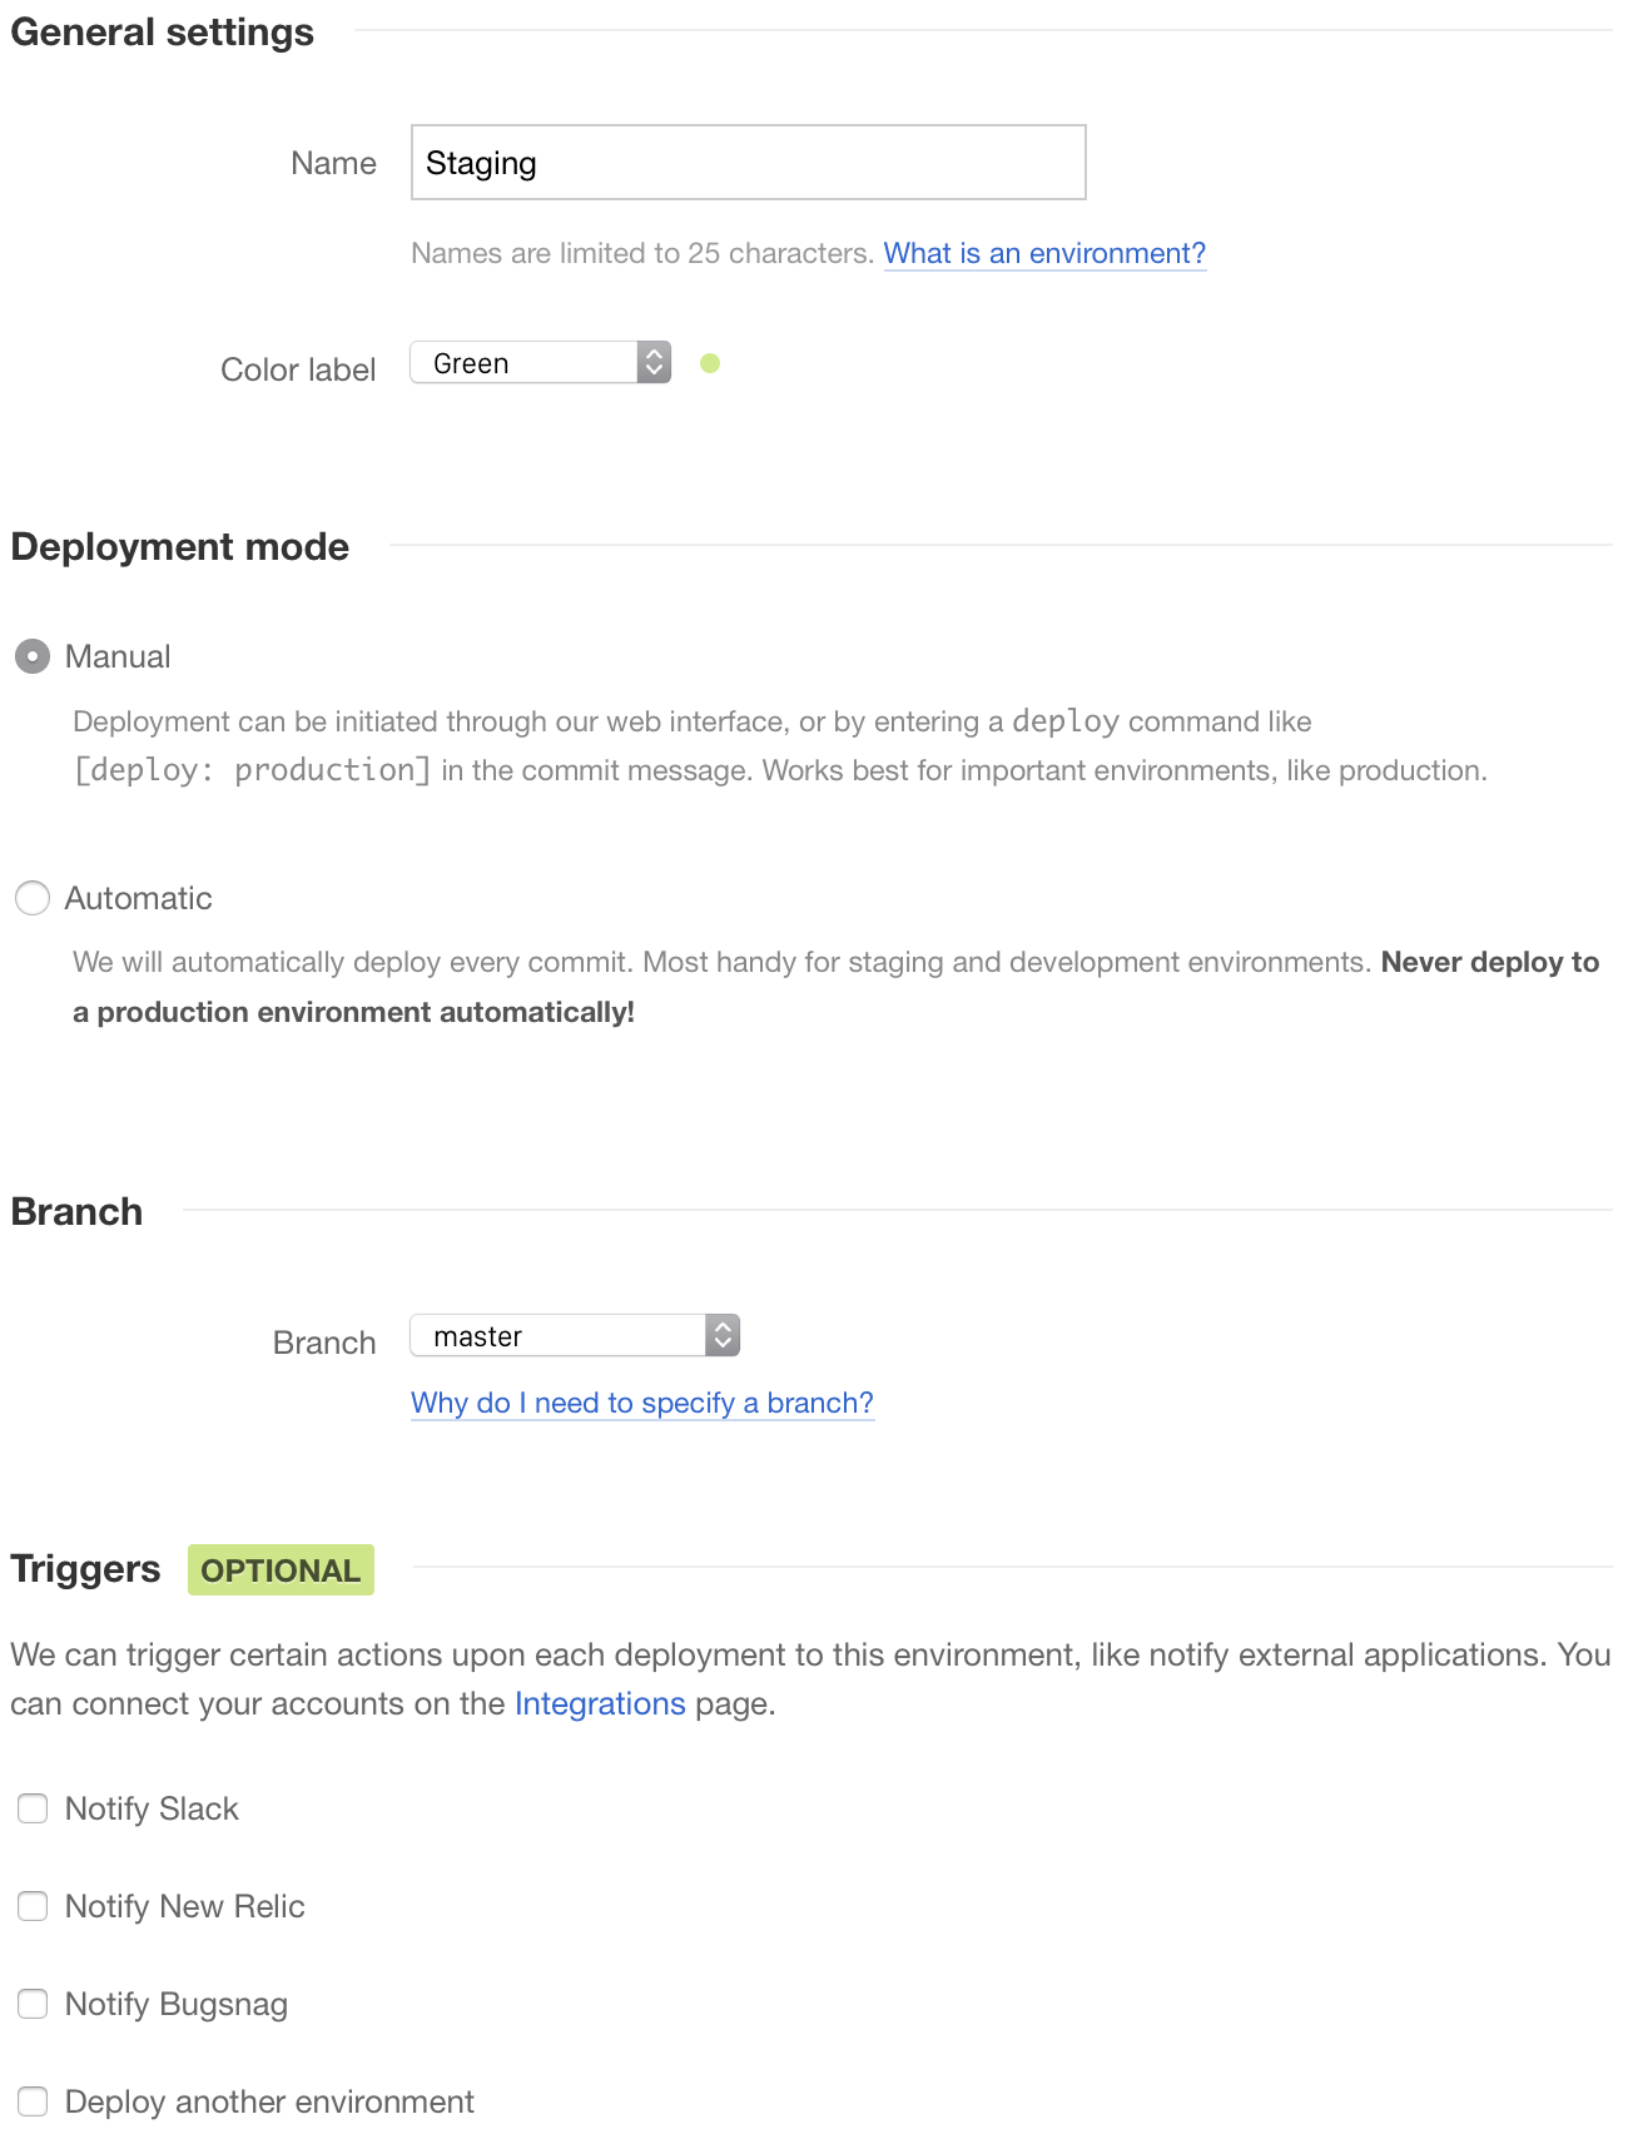
Once you have a running server in your DeployBot account, it’s very easy to get up and running. First, let’s start by creating a new environment within Deploybot. An Environment is a way to organize multiple servers into logical groups. Some common examples of deployment environments are Production, Live, Staging, Testing, or Development, but in the end it’s completely up to you. For this example, we’ll name our environment Staging, as we are going to use it to test the concept.

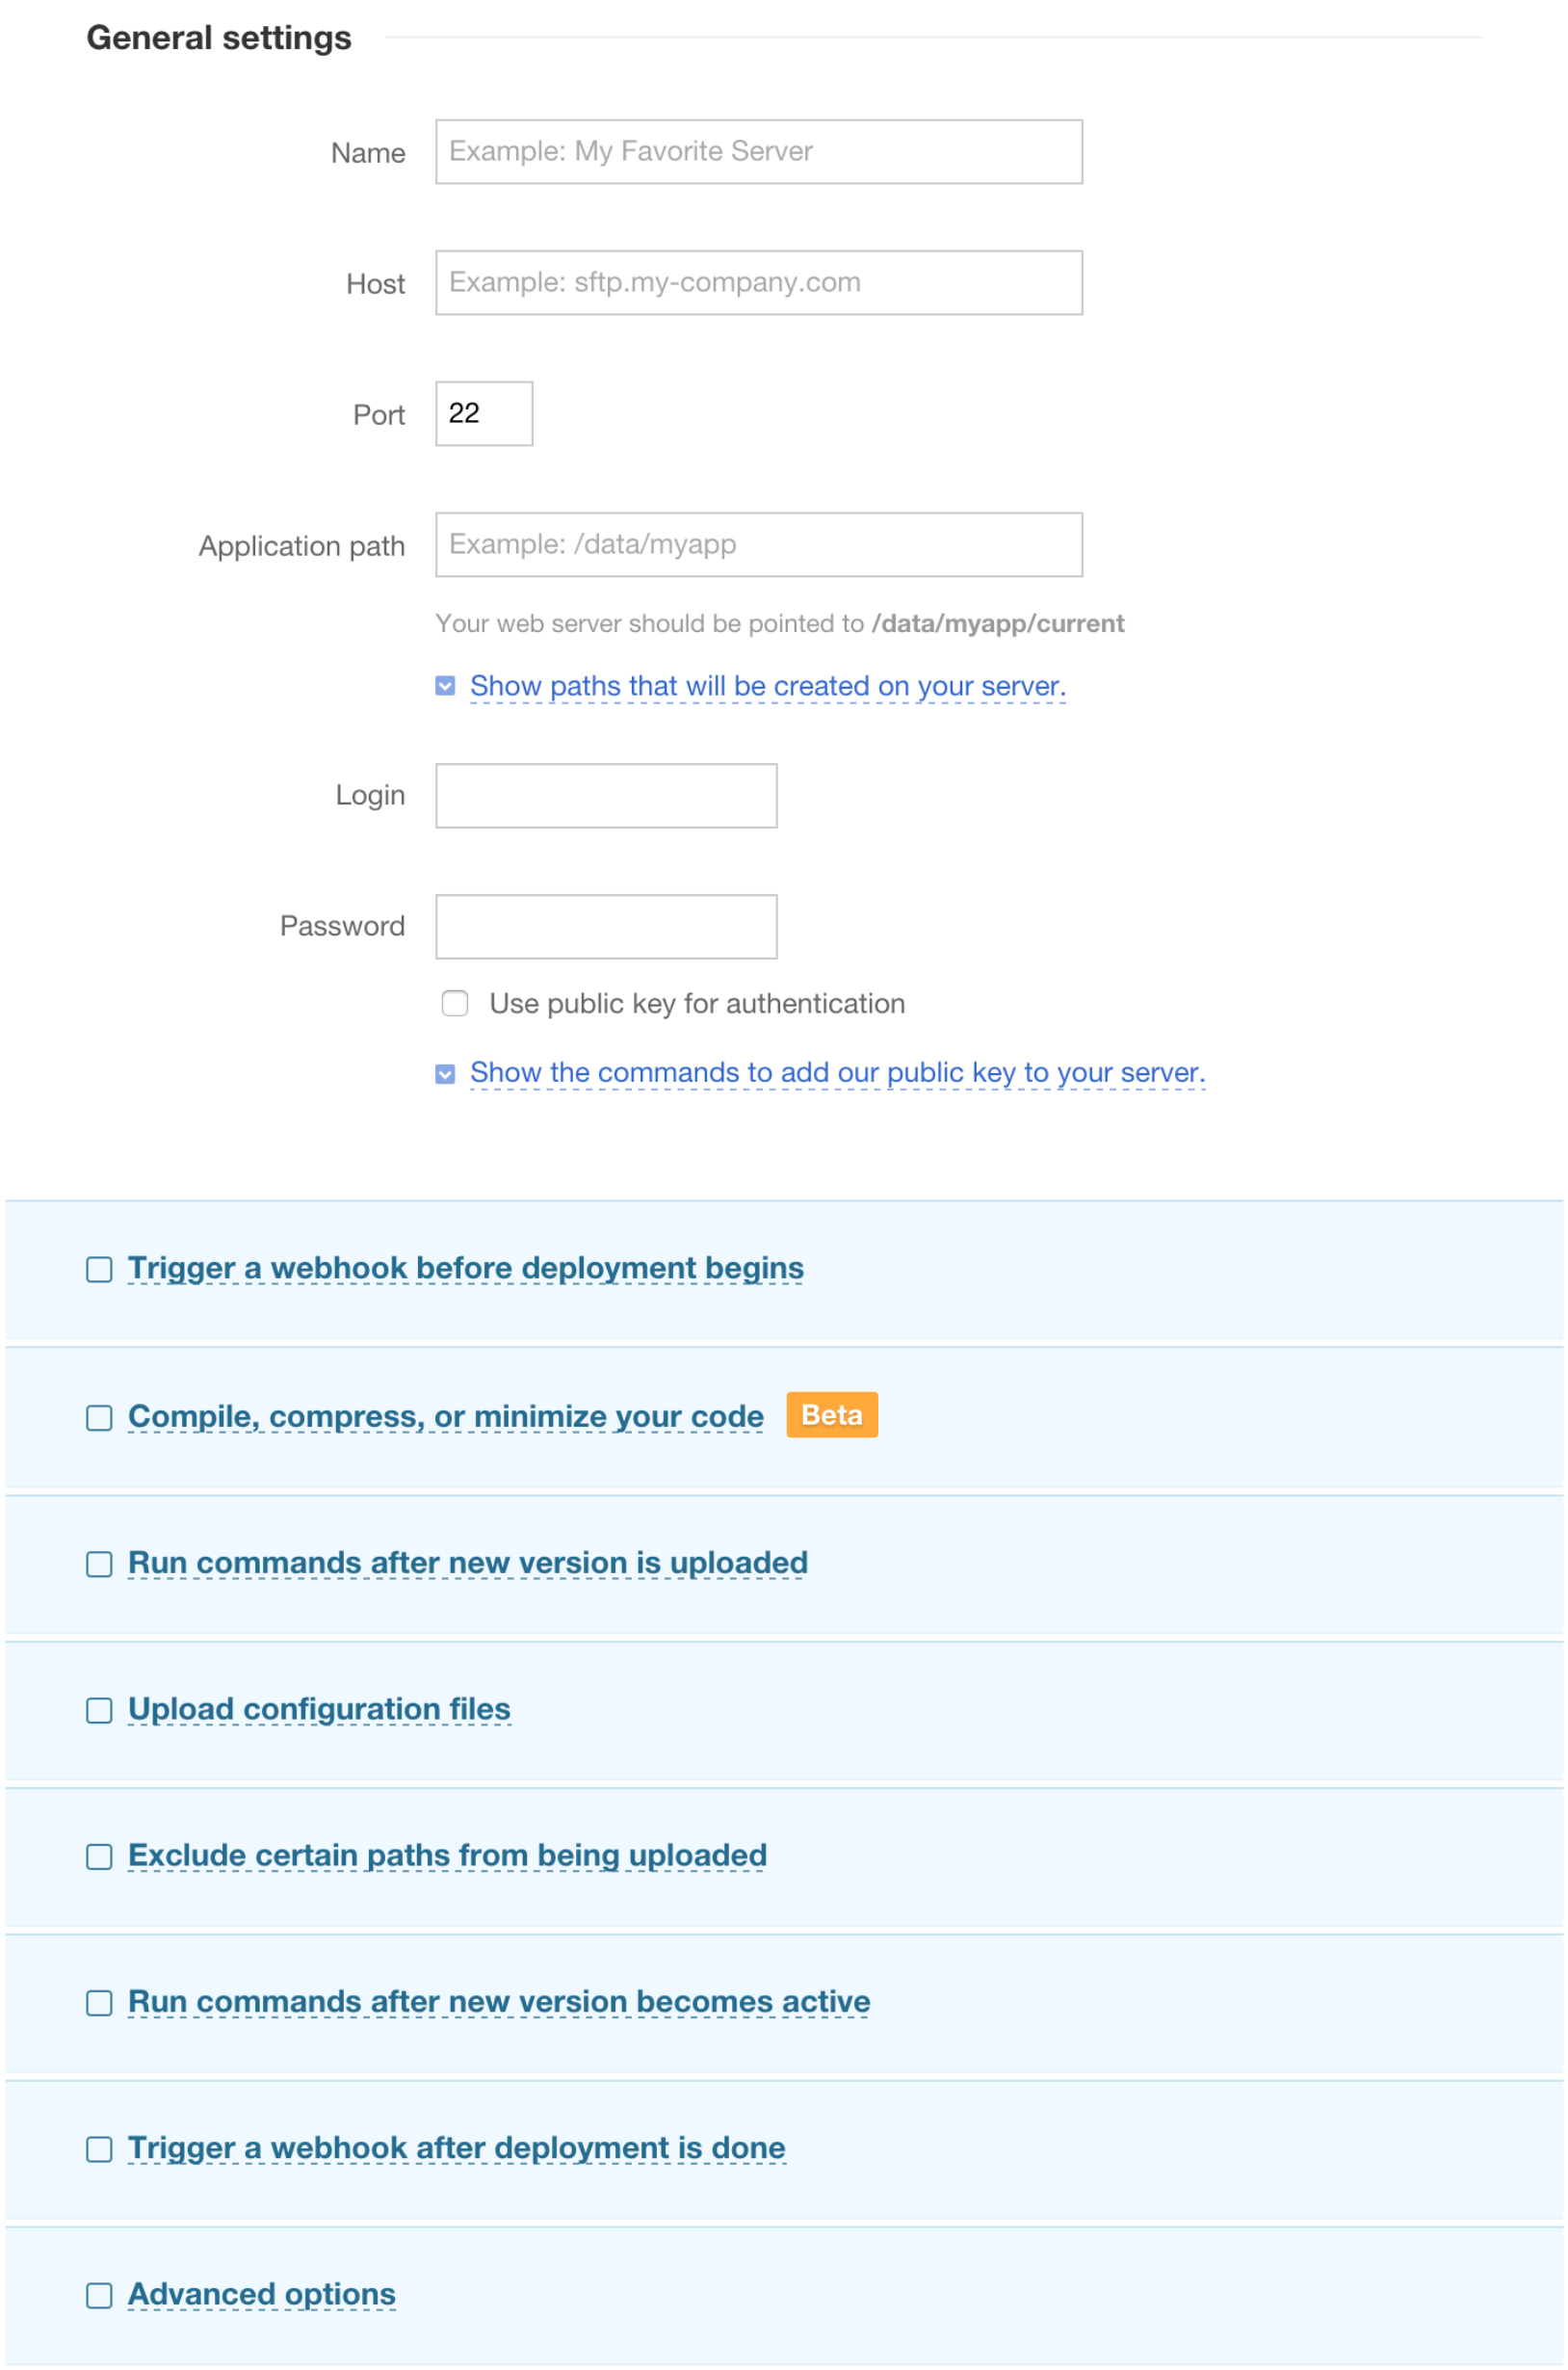
Once your environment is set up, we need to add at least one server into it. This Server will be the target for deploying Ruby on Rails, so it doesn’t only describe the host/login/password, but also what files have to be put on the server and where, along with many other details if you need them.
You can see that DeployBot supports several different flavors of target servers such as FTP / SFTP, Amazon S3, Shell deployments, and others. Each of these are worth exploring separately if you want to build a really custom tailored deployment procedure down the road, but this time we will focus on one of the most useful for a Rails app — Atomic SFTP deployment.
Atomic SFTP is designed so that there’s no downtime during a deployment. Your deployments either happen completely or not at all, and the previous code keeps running if the deployment goes bad. Then, in a situation when a file fails to be transferred and the deployment fails your application will not be affected. Atomic SFTP deployments use the SSH protocol, which is widely supported almost everywhere these days. SSH is a very secure and reliable protocol and SFTP deployments greatly benefit from that.

First you’ll need to name your server, and this is completely up to you. It’s just a label for your convenience. Quite often people just use the host name of the server.
Now we need to put in the host, port and login information from DigitalOcean droplet. You can find this specific information once you log in into the droplet with SSH. It will be printed out in the terminal:
$ ssh root@104.131.53.101
…
You can use the following SFTP credentials to upload your files (using FileZilla/WinSCP/Rsync):
  * Host: 104.131.53.101
  * User: rails
  * Pass: Zew8bsvs1hU
…
Copy that information into the server form and make sure that “use public key authentication” option is turned off in Deploybot.
The next thing we need to provide is the application path. This is the path where the deployment will put all of the files and create a structure necessary to support the atomic deployments. We’ll use /home/rails/myweb1, and that will mean that your application will reside in /home/rails/myweb1/current, which will be a symbolic link to the currently running version. This should look familiar if you have used Capistrano in the past.
Now we’re coming to the Rails specific section. As you can see in the server form, you have several options to customize your deployment scenario — like triggering webhooks, compiling assets, executing commands on your server and so on. Before the Rails app can work, we need to make sure a few things happen on the server. For instance:
- Proper Ruby is selected (if using RVM)
- DB is set up and all migrations are processed
- All gem dependencies are up to date
- Assets are compiled (if necessary)
For that, we need to add these commands to run after a new version is uploaded:
rvm install
gem install bundle
bundle install --deployment
bundle exec rake db:setup
bundle exec rake db:migrate
RAILS_ENV=production bundle exec rake assets:precompile
Note about building assets and compilation: if you are not using the asset pipeline feature that comes with Rails, but are using Grunt, Gulp or some other task runner or post-processor, you can include the commands to build your assets into the “Compile, compress, or minimize your code” section. This allows you to execute absolutely any commands in any available Docker container to transform your source code, and that includes running Sass, LESS and other CSS or JavaScript transformers. Just put in your Grunt or Gulp command there and that’s it. All of the generated files will be deployed to your server.
Now you can save the server in DeployBot and if your server details are correct everything should work fine. If not, you’ll see an error with an explanation.
Managing database.yml or other configuration files
Since you never want to store your secrets in source control, you also have an option to store your configuration files with secrets in DeployBot and let us deploy them to your server. This allows you to keep sensitive data out of your repository. You can add the files in the Configuration files tab in your environment. After the file is added, you can edit your server settings and configure it to get deployed to a specific location:

Before deploying your Rails app
If you are using the default Ruby on Rails DigitalOcean droplet, there are some things you’ll need to tweak on the droplet itself. You’ll need to edit the /etc/nginx/sites-enabled/rails file and change root directive to this:
root /home/rails/myweb1/current/public;You’ll also need to change the /etc/unicorn.conf file and change working_directory to this:
working_directory "/home/rails/myweb1/current"
You can make both of these changes with nano or vim text editors. After you’re done make sure to run these commands:
/etc/init.d/nginx restart
/etc/init.d/unicorn restart
At this point we’re done with the setup. We're ready to deploy Ruby on Rails - and you won't believe how smooth it's going to be.
Deploy Rails - First Timer Tips
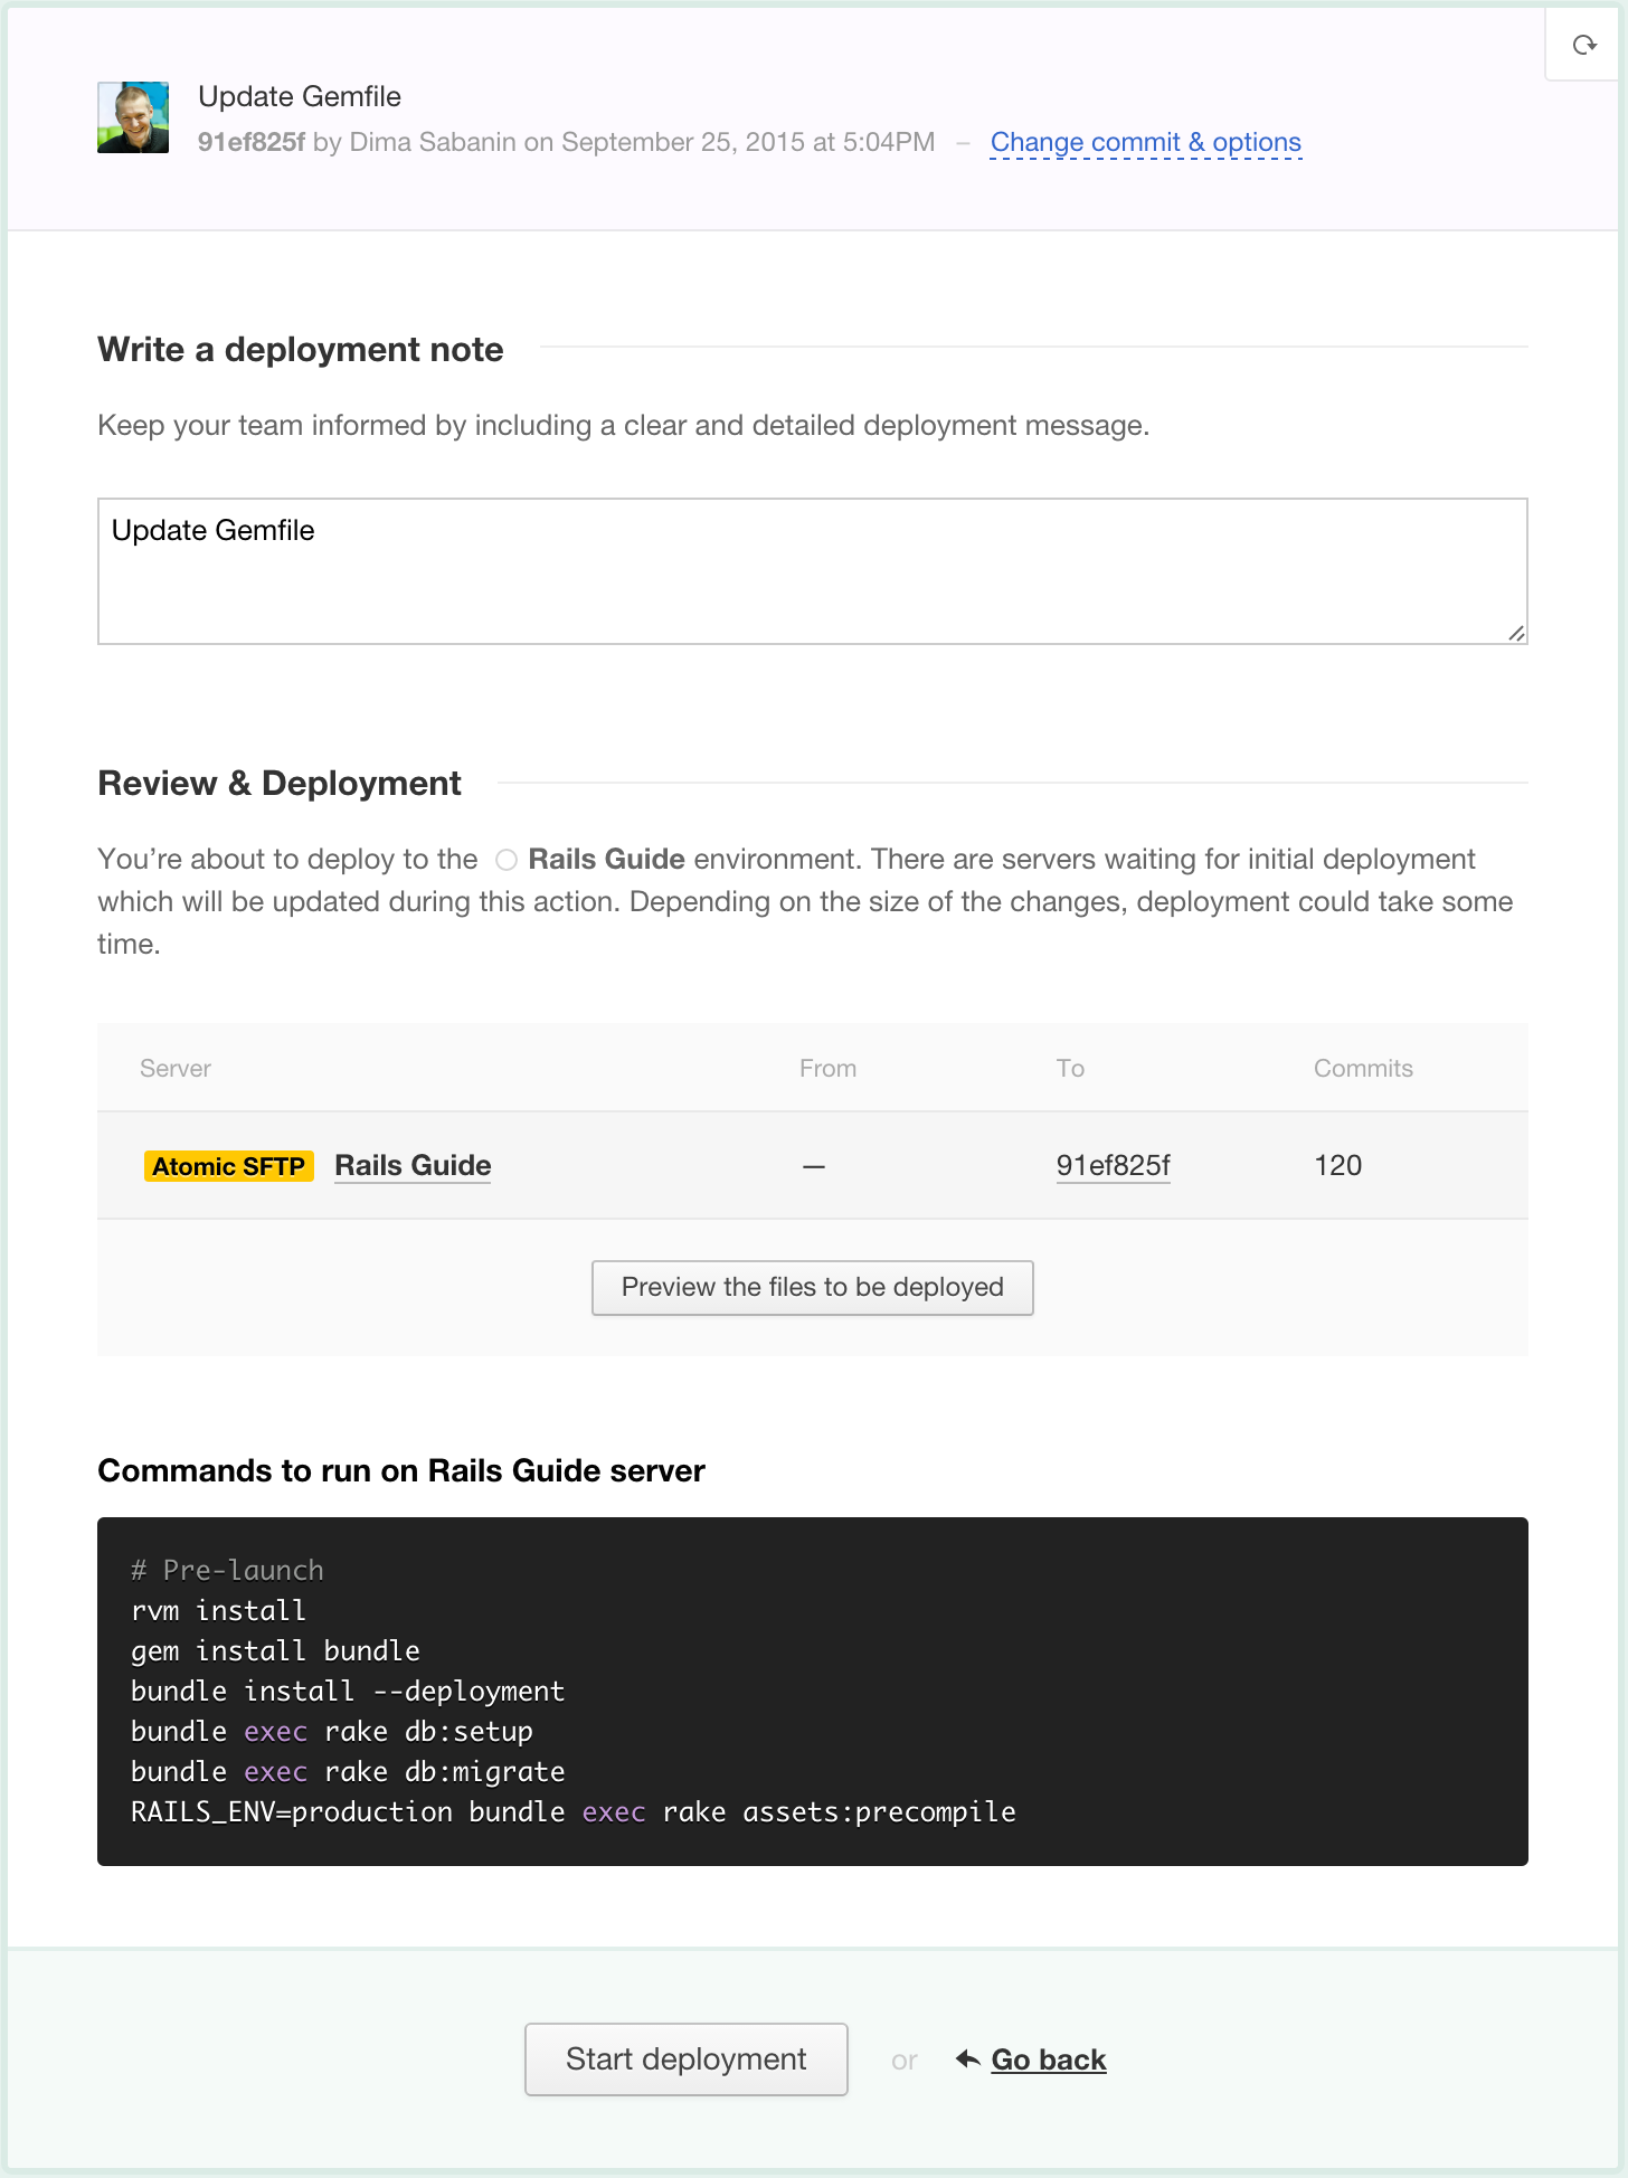
To trigger your first Ruby on Rails app deployment we’ll go to the environment page in DeployBot and use the Deploy button.
Here you can select what commit you’d like to deploy, see the changes that are going to happen, commands that will be executed and provide a note to your future self or your teammates about this Ruby app deployment. Once you’re ready, click “Deploy!” and things will start happening. Every time you deploy Rails applications with DeployBot, you'll see a real-time log that shows you exactly what's going on.

When your Rails deployment has finished, it will be marked either as success or failure. You’ll be able to review error messages in the log and you will also receive an incident notification regarding the error and usually steps that you can take to resolve it.
Manual or automatic Rails deployment?
You have a choice to configure your environment in manual or automatic mode. Automatic mode triggers a new deployment on every commit to a selected branch, while manual mode waits until you click the “Deploy” button in the app. We usually recommend sticking to manual deployment for your Live or Production environments and using automatic mode for the Testing or Staging.
Have suggestions or need help deploying Ruby on Rails?
This Ruby on Rails Deployment Guide is a continuous work in progress, as DeployBot keeps evolving and allowing us to make things simpler and more robust. We will keep updating it to make sure that it describes the best Rails deployment process we can offer. If you notice anything that can be improved in this document or need help, please email us.

