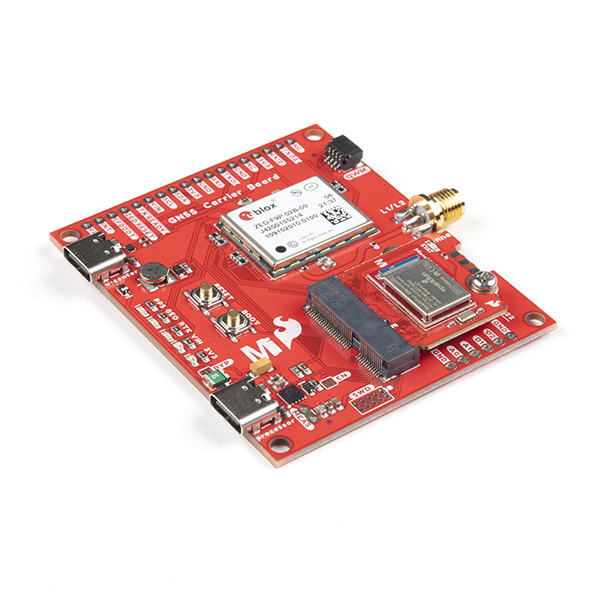
SparkFun MicroMod GNSS Carrier Board (ZED-F9P)
With GNSS you are able to know where you are, where you're going, and how to get there anywhere on Earth within 30 seconds. This means the higher the accuracy the better! GNSS Real Time Kinematics (RTK) has mastered dialing in the accuracy of their GNSS modules to just millimeters, and that's why we had to put it on this board! With the flexibility of the MicroMod's M.2 connector, you can easily test and swap out different MicroMod processor boards for your application. Simply match up the key on your board's beveled edge connector to the key on the M.2 connector and secure the boards with a screw. This means solderless access to the ZED-F9P modules features via UART1, UART2, SPI, and I2C ports!
The SparkFun MicroMod GNSS Carrier Board raises the bar for high-precision GPS and is in a line of powerful RTK boards featuring the ZED-F9P module from u-blox. The ZED-F9P is a top-of-the-line module for high accuracy GNSS and GPS location solutions including RTK that is capable of 10mm, three-dimensional accuracy. With this board, you will be able to know where your (or any object's) X, Y, and Z location is within roughly the width of your fingernail! The ZED-F9P is unique in that it is capable of both rover and base station operations. Utilizing the M.2 and Qwiic connectors, no soldering is required to connect it to the rest of your system. However, we still broke out 0.1"-spaced pins in case you prefer to use a breadboard to attach additional peripherals.
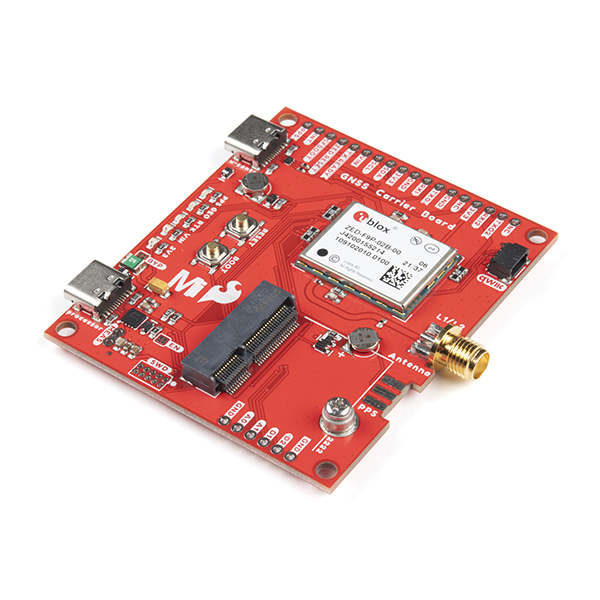
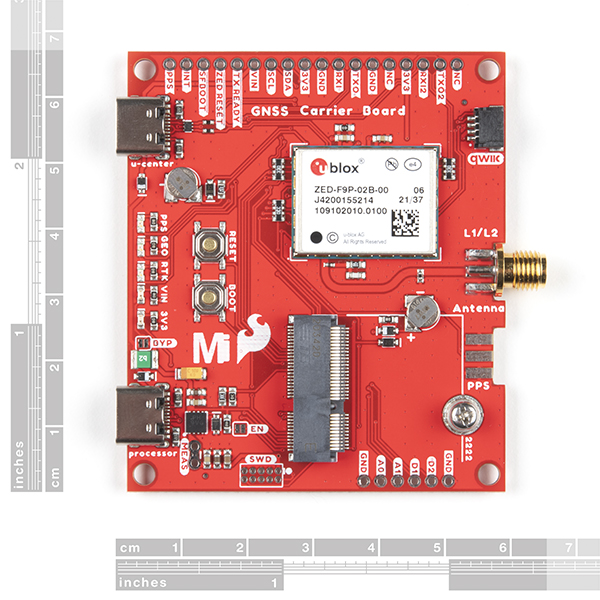
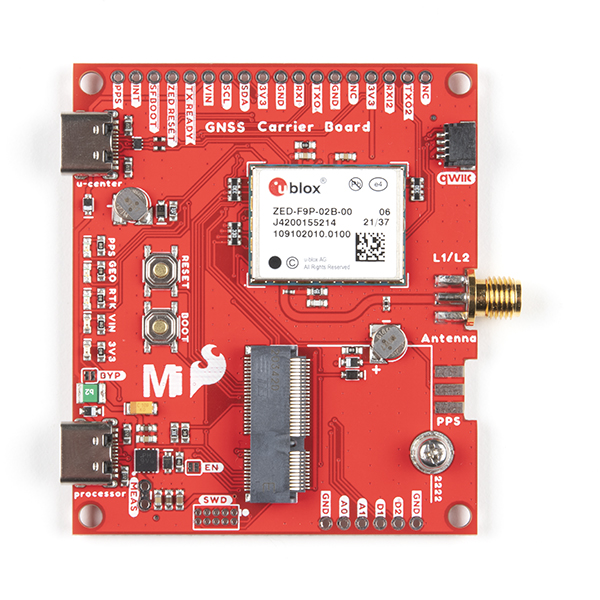
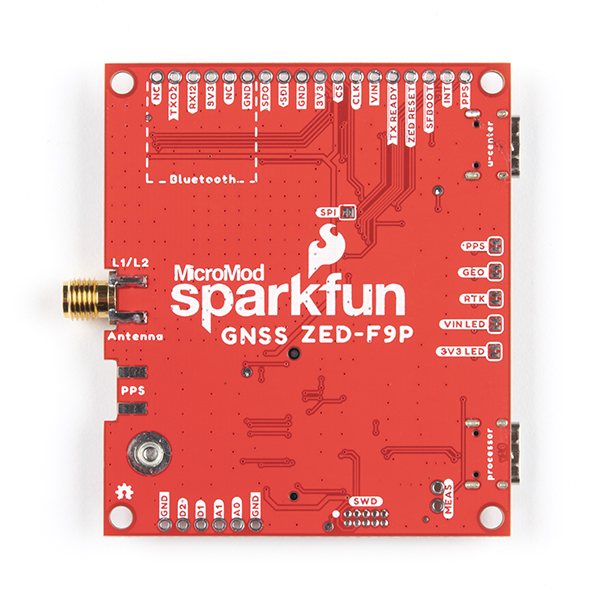
The board includes two USB-C connectors for power and programming. Two buttons for reset and boot are also populated on the board. A 2A resettable fuse and 3.3V/1A voltage regulator are built-in to the board for power. We've even added a convenient jumper for advanced users looking to bypass the fuse and another to measure the current consumption for low power testing. Five status LEDs are available for power, 3.3V, PPS, RTK, and geofencing. These can also be disabled via the jumper pads. One SMA connector is included for a secure connection to an antenna. For those that need a secure connection to the PPS pin, the SMA connector footprint is included in the design so that you can manually solder it to the board for your application. Finally, one Qwiic connector is populated on the board to easily add Qwiic enabled I2C devices to your projects!
We've even included a rechargeable backup battery to keep the latest module configuration and satellite data available for up to two weeks. This battery helps 'warm-start' the module, decreasing the time-to-first-fix dramatically. This module features a survey-in mode allowing the module to become a base station and produce RTCM 3.x correction data.
The number of configuration options of the ZED-F9P is incredible! Geofencing, variable I2C address, variable update rates, even the high precision RTK solution can be increased to 20Hz. The MicroMod GNSS carrier board even has five communications ports, four of which are all active simultaneously: USB-C (which enumerates as a COM port), UART1 (with 3.3V TTL), UART2 for RTCM reception (with 3.3V TTL), I2C (via the one Qwiic connector or broken out pins), and SPI. As previously mentioned, because of the MicroMod M.2 connector, the ZED-F9P's UART1, UART2, SPI, and I2C ports are available without soldering! Other SparkFun ZED-F9P offerings have this capability, but only after you solder hookup wires appropriately.
We've also written an extensive Arduino library for u-blox modules to make reading and controlling the MicroMod GNSS carrier board over the MicroMod's I2C bus is easy. Leave NMEA behind! Start using a much lighter weight binary interface and give your microcontroller (and its one serial port) a break. The SparkFun Arduino library shows how to read latitude, longitude, even heading and speed over I2C without the need for constant serial polling.
This product requires an antenna: Be sure to check out the related products/hookup accessories and pick a suitable SMA antenna for your project.
MicroMod is a modular interface ecosystem that connects a microcontroller “processor board” to various “carrier board” peripherals. Utilizing the M.2 standard, the MicroMod standard is designed to easily swap out processors and function boards on the fly. Pair a specialized carrier board for the project you need with your choice of compatible processor!
- This product is compatible with u-blox® PointPerfect & includes a redemption code for 1-month of unlimted access for a single device. Take your precision to the next level with the PointPerfect GNSS augmentation service.
- As of January 2023, a promotional card with a 16 digit referral code is included with your SparkFun packaging.
- If you purchased this product prior to January 2023 & would like to receive a redemption code, please reach out to SparkFun support with your order number & we will gladly send you one!
- Sign into Thingstream or create and account & follow the instructions on the card.
- This product is compatible with u-blox® PointPerfect & includes a redemption code for 1-month of unlimted access for a single device. Take your precision to the next level with the PointPerfect GNSS augmentation service.
- Concurrent reception of GPS, GLONASS, Galileo and BeiDou
- Receives both L1C/A and L2C bands
- Input Voltage: 5V or 3.3V but all logic is 3.3V
- Built-in Resettable PTC Fuse (Rated 5V/2A)
- AP7361C 3.3V Voltage Regulator (Rated 1A)
- ZED-F9P Current Consumption: 68mA - 130mA (varies with constellations and tracking state)
- Time to First Fix: 25s (cold), 2s (hot)
- Max Navigation Rate:
- PVT (basic location over UBX binary protocol) - 25Hz
- RTK - 20Hz
- Raw - 25Hz
- Horizontal Position Accuracy:
- 2.5m without RTK
- 0.010m with RTK
- Operational Limits
- Max G: ≤4G
- Max Altitude: 50km (49.7 miles)
- Max Velocity: 500m/s (1118mph)
- 1mAh battery backup for RTC
- Buttons
- Reset
- Boot
- LEDs
- Power
- 3.3V
- PPS
- RTK
- GEO
- Jumpers
- VIN
- MEAS
- BYP
- EN
- 3.3V
- PPS
- RTK
- GEO
- Connectors and Ports
- 1x M.2 (Solderless access to ZED-F9P via UART1, UART2, SPI, and I2C)
- 1x Qwiic
- 2x USB Type C (Programming Processor Board, Configuring ZED-F9P module)
- 2x SMA (GNSS Antenna, PPS*)
- 2x5 Bare SWD for MicroMod Processor Board
- Phillips #0 M2.5x3mm screw included
- Board Dimensions: 2.60" x 2.24" (66.04mm x 56.89mm)
* Note: The SMA connector is not included for PPS. For those that need to connect a SMA connector to the PPS pin, you will need to manually solder the SMA connector.
Note: The I2C address of the ZED-F9P is 0x42 and is software configurable. A multiplexer/Mux is required to communicate to multiple ZED-F9P moduels on a single bus. If you need to use more than one ZED-F9P module, consider using the Qwiic Mux Breakout.
MicroMod GNSS Carrier Documentation:
- Schematic
- Eagle Files
- Board Dimensions
- Hookup Guide
- Qwiic Info Page
- Arduino Library - v3
- GitHub Hardware Repo
ZED-F9P Documentation:
- Datasheet
- UBX and NMEA Protocol Manual
- Integration Manual
- Product Summary
- Release Notes - FW1.00
- Example RTCM output
- u-blox ECCN
MicroMod Documentation:
SparkFun MicroMod GNSS Carrier Board (ZED-F9P) Product Help and Resources
What is GPS RTK?
September 14, 2018
Learn about the latest generation of GPS and GNSS receivers to get 14mm positional accuracy!
How to Upgrade Firmware of a u-blox GNSS Receiver
March 26, 2021
A few steps and you'll upgrade to the latest features on a u-blox GNSS receiver.
MicroMod GNSS Carrier Board (ZED-F9P) Hookup Guide
December 9, 2021
Easily switch between Processor Boards using the MicroMod ecosystem and get precision down to the diameter of a dime with the ZED-F9P from u-blox using the MicroMod GNSS Carrier Board!
Getting Started with U-Center for u-blox
September 13, 2018
Learn the tips and tricks to use the u-blox software tool to configure your GPS receiver.
Setting up a Rover Base RTK System
October 14, 2020
Getting GNSS RTCM correction data from a base to a rover is easy with a serial telemetry radio! We'll show you how to get your high precision RTK GNSS system setup and running.
Getting Started with MicroMod
October 21, 2020
Dive into the world of MicroMod - a compact interface to connect a microcontroller to various peripherals via the M.2 Connector!
How to Build a DIY GNSS Reference Station
October 15, 2020
Learn how to affix a GNSS antenna, use PPP to get its ECEF coordinates and then broadcast your own RTCM data over the internet and cellular using NTRIP to increase rover reception to 10km!
GNSS Correction Data Receiver (NEO-D9S) Hookup Guide
October 27, 2022
Add GNSS correction data to your high precision GNSS (HPG) receiver with the u-blox NEO-D9S! This tutorial will get you started with the ZED-F9P, NEO-D9S, and the ESP32 IoT RedBoard.
Getting Started with u-blox Thingstream and PointPerfect
January 23, 2023
Interested in high precision GNSS without setting up a base station?
Core Skill: DIY
Whether it's for assembling a kit, hacking an enclosure, or creating your own parts; the DIY skill is all about knowing how to use tools and the techniques associated with them.
Skill Level: Noob - Basic assembly is required. You may need to provide your own basic tools like a screwdriver, hammer or scissors. Power tools or custom parts are not required. Instructions will be included and easy to follow. Sewing may be required, but only with included patterns.
See all skill levels
Core Skill: Programming
If a board needs code or communicates somehow, you're going to need to know how to program or interface with it. The programming skill is all about communication and code.
Skill Level: Competent - The toolchain for programming is a bit more complex and will examples may not be explicitly provided for you. You will be required to have a fundamental knowledge of programming and be required to provide your own code. You may need to modify existing libraries or code to work with your specific hardware. Sensor and hardware interfaces will be SPI or I2C.
See all skill levels
Core Skill: Electrical Prototyping
If it requires power, you need to know how much, what all the pins do, and how to hook it up. You may need to reference datasheets, schematics, and know the ins and outs of electronics.
Skill Level: Rookie - You may be required to know a bit more about the component, such as orientation, or how to hook it up, in addition to power requirements. You will need to understand polarized components.
See all skill levels
Comments
Looking for answers to technical questions?
We welcome your comments and suggestions below. However, if you are looking for solutions to technical questions please see our Technical Assistance page.
Customer Reviews
No reviews yet.

